Deploy to Azure web app deployment slot using Github Actions
tl;dr: use the production slot’s app name and the staging slot’s publish profile and slot name.
Deployment slots is a great feature for Azure web apps. Deployment slots gives you to a staging environment of your web app that allows you to try out your code changes in an isolated environment with a separate configuration. It also allows for swift rollbacks if things go south after a deploy.
BUT. Deploying your app to a deployment slot is not as straight forward as deploying to a web app without deployment slots enabled. In this blog post I’ll go through the process and the things you need to think about when using Github Actions to deploy to an Azure web app deployment slot.
I’ll assume that you’re already familiar with deployment slots and already have your environments set up. If not, please reference the official documentation from Microsoft. I’ll also assume that you’re familiar with Github Actions and YAML.
Step 0.5
For this tutorial I’ve created an Azure web app called ‘my-pretty-app’. It has two deployment slots. The default production slot and a staging slot simply called ‘staging’.
The one thing I (and I assume you as well) always mess up is that if we want to deploy to the staging slot of our app, we need the app name from the PRODUCTION SLOT, but the publishing profile from the STAGING SLOT. We also need the staging slot name. So first of all we need to get these values.
Step 1
Log in to the Azure portal and navigate to your web app’s production slot.

The highlighted piece of text above is your resource’s app name. Copy this and save it for step 4. If you prefer you can also click ‘JSON View’ in the top right corner in the same view and copy the ‘name’ value (without quotation marks) from the JSON definition.
Step 2
Now navigate to your staging slot. Click the ‘Get publish profile’ button. A file containing your staging slot’s publish profile will now be downloaded to your machine.
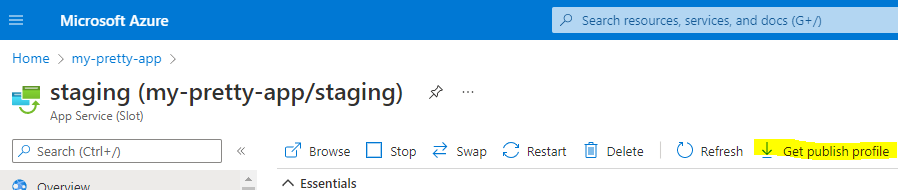
The entire content of the downloaded file makes up the publish profile value which we’ll use in step 4.
Step 3
When you created the staging slot, you assigned it a name. If you’ve forgotten what that name was, you can find it by navigating to the staging slot in the Azure portal.
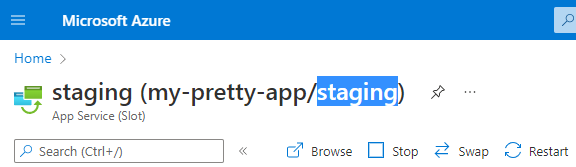
The highlighted text is your staging slot’s name. Copy this and save it for step 4.
Step 4
Let’s all put this together now. It’s an extremely bad practice to hardcode secrets/credentials/API keys in your code, so you’re better off storing them in e.g. an Azure key vault or another secret storage of your choice.
In this tutorial I’ve added the values we retrieved in steps 1, 2 and 3 as environment secrets in the Github repo holding the source code to our application. And we’re now passing them as arguments to the webapps-deploy action.
If you’re not familiar with Github secrets, please reference the official documentation.
Add the following job to the .yml file that handles the deployment of your app.
# The rest of your YAML script goes here

deploy: #Job name, this can be anything you prefer
    runs-on: your-preferred-os #Usually windows-latest or ubuntu-latest
    steps:
      - uses: azure/webapps-deploy@v2 #import the Azure webapps-deploy action v2
        with:
          app-name: "${{ secrets.APP_NAME }}" #Your PRODUCTION SLOT'S APP NAME goes here
          publish-profile: ${{ secrets.AZURE_WEBAPP_PUBLISH_PROFILE }} #Your STAGING SLOT'S PUBLISH PROFILE goes here
          slot-name: "${{ secrets.SLOT_NAME }}" #Your staging slot name goes here
Final notes
Notice that the app-name and slot-name values needs to be enclosed by quotation marks. After running this script your app should be deployed to the staging slot of your web app!
If you haven’t already installed it, I highly recommend the Redhat YAML VS Code extension to anyone working with YAML. It has saved me a lot of time and trouble over the years.
Happy coding!